


MyIdentity Smart Button asigura o solutie simpla si sigura de accesare a datelor personale ale utilizatorului.
Faceti click pe butonul de mai jos pentru a experimenta o identificare completa cu MyIdentity:
                    {
                      "firstName": "John",
                      "lastName": "Smith",
                      "isAlive": true,
                      "age": 27,
                      "address": {
                        "streetAddress": "21 2nd Street",
                        "city": "New York",
                        "state": "NY",
                        "postalCode": "10021-3100"
                      },
                      "phoneNumbers": [
                        {
                          "type": "home",
                          "number": "212 555-1234"
                        },
                        {
                          "type": "office",
                          "number": "646 555-4567"
                        }
                      ],
                      "children": [],
                      "spouse": null
                    }
![]()
![]() Acum ca ati vazut butonul in actiune, adaugati codul butonului in platforma dvs. Copiati si inserati acest cod intr-o pagina HTML si vizualizati-o in browser.
Acum ca ati vazut butonul in actiune, adaugati codul butonului in platforma dvs. Copiati si inserati acest cod intr-o pagina HTML si vizualizati-o in browser.
            <script src="https://www.myidentity.bio/sdk/js?client-id=test"></script>
            <script>myidentity.Buttons().render('body');</script>
Tip: Pentru testarea functionalitatii butonului va recomandam sa folositi „Create a sandbox account”
Inainte de inceperea integrarii va rugam sa consultati arhitectura integrarii cu MyIdentity Smart Button:
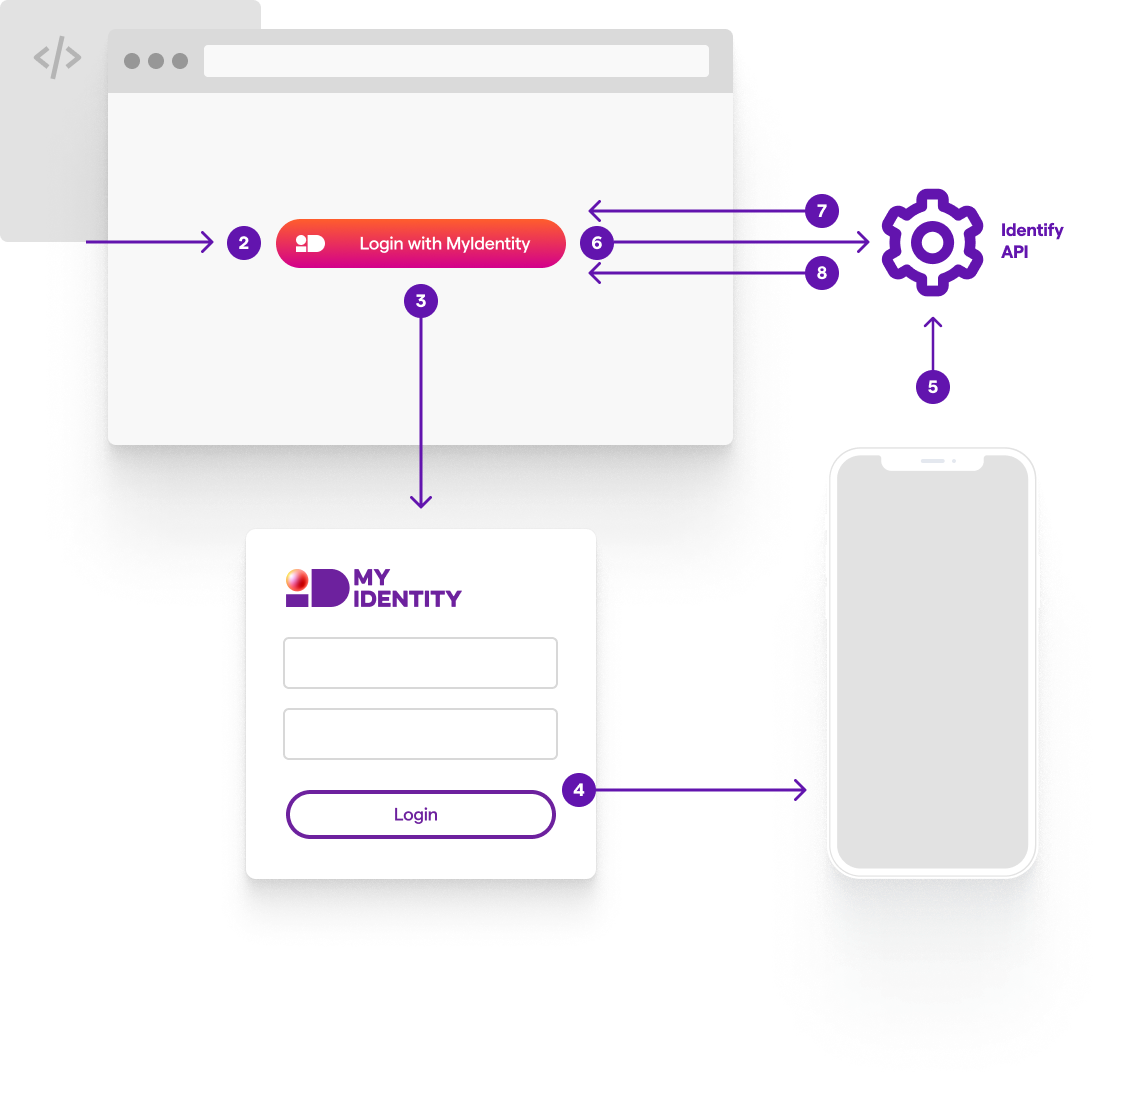
Acest ghid de integrare va va ajuta:
Pentru generarea credentialelor REST API pentru mediile sandbox si live:
            <!DOCTYPE html>
            <head>
              <meta name="viewport" content="width=device-width, initial-scale=1">
              <meta http-equiv="X-UA-Compatible" content="IE=edge" />
            </head>

            <body>


              <script
                src="https://www.myidentity.bio/sdk/js?client-id=YOUR_CLIENT_ID"> // Required. Replace YOUR_CLIENT_ID with your sandbox client ID.
              </script>
            </body>
            <body>

              <script
                src="https://www.myidentity.bio/sdk/js?client-id=YOUR_CLIENT_ID"> // Required. Replace YOUR_CLIENT_ID with your sandbox client ID.
              </script>

              <div id="myidentity-button-container"></div>

              <script>
                myidentity.Buttons().render('#myidentity-button-container');
                // This function displays the Identify Smart Buttons on your page.
              </script>
            </body>
Implementati functia onApprove care este apelata cand clientul/utilizatorul este autentificat cu succes.
            myidentity.Buttons({
              onApprove: function(data) {
              // The data object represents a successfull identification sessions.
              // It does not contain any specific user details
              // The data object is sent to your own login api which uses the
              fetch('/your-own-login-url', {
                // other `fetch` function call configuration attributes, like method, headers, etc
                body: JSON.stringify(data)
              })
                .then((response) => {
                  // Process your own successul login response
                })
                .catch((err) => {
                  // Process your failed successul login response
                })
              }
            }).render('#myidentity-button-container');